Introduction
AI agents are moving beyond tools that simply answer questions in a chat window. They are increasingly being used to research information, organize files, track tasks, run commands, create reminders, and interact with external systems.
This shift matters because it brings artificial intelligence closer to the kind of routine a real person might follow when performing work-related tasks. Instead of asking for a single isolated answer, you can ask an agent to complete a more complex task:
- Research the prices of office supplies in our area;
- Build a spreadsheet with the leads we collected in our CRM;
- Read my emails and give me a summary of the items I need to handle on Monday.
This is where OpenClaw becomes interesting. It is an open-source project focused on creating a personal AI assistant that runs in an environment controlled by the user. The idea is to let the agent communicate through familiar channels, such as WhatsApp and Telegram, while completing tasks with more autonomy than a traditional AI chat, in a way that is closer to how a real person would approach the work.
In this article, we will look at what OpenClaw is, how its architecture works, which environments are supported for installation, and how to configure it with Telegram and an OpenAI model. We will also cover important security considerations when installing and using the agent, compare it with other tools in the market, and walk through a practical example of automating an everyday task: creating a bill reminder spreadsheet and sending daily notifications.
What is OpenClaw?
OpenClaw is a platform for creating a self-hosted personal AI agent. In simple terms, this means you run the assistant in your own environment, such as a personal computer, virtual machine, VPS, or dedicated server, and decide which channels, files, tools, and permissions it can use.
This is different from opening an AI chat in the browser and asking questions. In a standard chat interface, you usually interact with the model inside the product's own interface. In OpenClaw, the model is only one part of the solution. Around it, there is an operational layer that allows the agent to receive messages, maintain sessions, manage its own files, run tools, and participate in more continuous routines.
Think of an office worker during a normal day. This person usually has access to their own computer. They can use email, create documents and spreadsheets, attend meetings, create reminders, and work with other tools and systems that make sense for their responsibilities.
OpenClaw tries to bring that logic to an AI agent. It connects a conversation interface, such as Telegram or another messaging channel, to an environment where the agent can consult context, work with files, call tools, and execute tasks within limits defined by the user.
Because of that, the best way to understand OpenClaw is not as a regular chatbot, but as a platform for operating a personal AI assistant.
What are AI agents?
Before going into OpenClaw's architecture, it is worth reinforcing the concept of an agent, which I covered in this introductory article.
An AI agent is a system that combines a model, instructions, tools, and context to complete a task with some degree of autonomy. Instead of only generating a text response, it can break a goal into steps, choose tools, execute actions, observe the result, and keep working until it produces a useful outcome.
Think of two situations.
In the first, you ask an assistant: "what are the main points of this contract?". It reads the text and responds with a summary. That can already be useful, but the interaction ends there.
In the second, you ask: "analyze this contract, highlight the main risks, create a table with sensitive clauses, save the result to a file, and notify me when you are done". In this case, the system needs to do more than respond. It needs to understand the goal, work with a document, structure an output, write a file, and perhaps send a notification.
The second situation is closer to the idea of an agent.
In practical terms, agents usually combine a few elements:
- AI model, responsible for interpreting the request and generating decisions or responses;
- Tools, which allow the agent to consult data, open pages, read files, write files, or run commands;
- Context, which includes instructions, history, files, and relevant information;
- Memory or continuity, so the agent can maintain some state across interactions;
- Permissions, which define what the agent can and cannot do.
OpenClaw fits into this category. Its goal is to provide the structure needed for this kind of agent to work as a personal assistant, accessible through everyday channels and capable of completing tasks in a more continuous way.
How is OpenClaw's architecture structured?
OpenClaw's architecture is built around a few main concepts that allow the agent to keep running indefinitely, handling requested or scheduled tasks. Let's look at the main parts.
Gateway
At the center of the agent, there is the Gateway, the process responsible for coordinating the system's connections. It keeps communication flowing between clients, channels, agents, and tools. It also receives events, manages sessions, and provides a WebSocket-based API so different parts of the system can communicate with each other.
For a non-technical reader, the Gateway is the component that keeps the assistant "alive". It allows the agent to operate without depending only on a chat window open in a browser. The service can keep running to receive messages, react to events, execute scheduled tasks, and maintain the assistant's operation.
This idea matters because personal agents usually need continuity. A useful assistant should not exist only while you have a browser tab open. It needs to receive a message later, respond through another channel, remember a routine, or resume work that was already in progress.
Messaging Channels
Messaging channels are the ways you talk to the agent.
One of OpenClaw's most attractive points is that it allows the assistant to be accessed through channels the user already uses. Among the supported providers, there are channels such as WhatsApp, Telegram, Discord, Microsoft Teams, Slack, and others.
This ability to integrate the agent with channels the user already relies on makes interaction easier. Instead of opening a specific application, logging in, and starting a conversation from scratch, you can interact with the agent as if you were sending a message to a real person.
Another advantage is that you do not need to be in front of a computer to use the agent. Imagine you are away from your desk and remember something important, such as a quote you need to review when you get home. If the agent uses a messaging channel like WhatsApp or Telegram, you can simply open the app and send a message to the agent: "Please remind me to review that important quote later."
This opens up many possibilities for both personal and professional tasks. I sometimes step away from my computer to do something else and, while I am away from my office, I talk to agents to develop software solutions or take notes on other important tasks I need to handle.
What is the workspace?
The workspace is the agent's working area. In practice, it is usually a directory where OpenClaw can organize files, create and maintain supporting documents, and store artifacts produced during tasks. This is where the agent can, for example, save a summary, generate a table, assemble a list of links, or create a draft report.
What does it mean for the agent to run commands?
Command execution is one of OpenClaw's most powerful capabilities, but also one of its most dangerous aspects.
For an agent to work with spreadsheets or generate Word documents, send emails, browse the web, or interact with other kinds of applications, it needs a way to "talk" to those applications. For a real person, this means moving the mouse, using the keyboard, or touching a phone or tablet screen. Since the agent is not a real person, it needs to do this programmatically.
Depending on where the agent is installed (a server or a computer running Windows, Linux, macOS, and so on), it can access tools that allow it to run commands in the operating system. On Linux and macOS, this usually happens through the Terminal with bash, and on Windows through PowerShell.
When an agent can run commands in its environment (by environment, I mean the computer where it is running), it stops merely "talking about" a task and starts acting on files, processes, and installed tools. It can list directories, run scripts, call command-line tools, move files, generate reports, and automate steps that would normally require manual intervention.
This capability is one of the main reasons the agent can perform a wide range of tasks autonomously. Combined with a capable AI model, the agent can decide which programs it needs to use and what it needs to do to complete a task, then act independently (similar to an employee carrying out tasks on their computer at the request of a manager).
However, command execution also introduces risk. AI models are trained to complete tasks using the resources available to them, and because they make decisions autonomously, sometimes without considering the safest path, they may run destructive commands in the operating system, which can lead to data loss or other serious problems.
In a recent case, a Meta employee had her emails accidentally deleted because an AI agent decided to use destructive commands while trying to complete a task.
Beyond the risk of destructive commands, installing OpenClaw on a personal computer without proper permission settings can allow it to run commands outside its workspace, compromising security. Imagine the agent decides to read a file containing confidential data or passwords. With the wrong commands, that data could be exposed, compromising the security of your computer and the accounts you have access to.
OpenClaw's own documentation treats command execution as a feature that should be configured carefully. The documentation mentions mechanisms such as manual user approval and an allowlist of commands that may be executed.
To avoid problems, you need to be careful about what you ask the agent to do and, more importantly, install OpenClaw in a safe environment, preferably separate from your personal machine. For personal testing, the most cautious path is to start with limited access. First, let the agent work in an isolated directory with test files. Then, enable simple commands. Only later does it make sense to connect sensitive routines or allow broader access.
If you are unsure how to perform a safe installation, ask someone with technical experience for help (or contact us, since this type of work is part of our consulting services).
What are scheduled tasks in OpenClaw?
Scheduled tasks allow the agent to do something at a specific time or on a recurring interval.
In OpenClaw, this feature appears through cron integrated into the Gateway. The documentation describes cron as the built-in scheduler that persists tasks, wakes the agent at the right time, and can deliver the result back to a chat channel or webhook.
This is very important for a personal assistant.
Without scheduling, the agent is only reactive. It waits for a message and responds. With scheduling, it can participate in routines. This creates room for use cases such as:
- sending a weekly reminder;
- preparing a daily summary;
- periodically checking a page or status;
- organizing a task list at a fixed time;
- preparing a recurring report.
As a real example, I have a personal agent with a scheduled task that sends me a list of AI and technology news every Monday. It collects updates from several online sources in countries such as Brazil, the United States, and China, then sends me a summary of the most relevant items. This is one way I keep up with what is happening in the field and bring relevant topics to Fronteira Labs.
I also have a few processes that periodically remind me of bills to pay, emails I need to respond to, items I need to buy, and so on. Creativity is the limit for scheduled tasks.
This type of use may seem simple, but it is exactly where personal agents tend to create value. In everyday life, much of the work is not made of spectacular tasks, but of repeated routines, recurring checks, and information organization.
How to install OpenClaw?
The official OpenClaw documentation presents different installation paths. For most users, the recommended path is to use the official installer or the CLI onboarding flow.
The basic requirements include Node.js, with Node 24 recommended in the current documentation, or compatible versions indicated by the project. OpenClaw supports macOS, Linux, native Windows, and WSL2, although WSL2 is presented as the more stable option for Windows.
Warning: as explained in the command execution section, installing OpenClaw on your personal machine can create risks due to the destructive potential of command execution.
The recommended installer for macOS, Linux, or WSL2 is:
curl -fsSL https://openclaw.ai/install.sh | bash
If you use macOS, you can open the Terminal, run the command above, and follow the installation instructions.
On Windows, you can open PowerShell and run the command below (start PowerShell as administrator):
iwr -useb https://openclaw.ai/install.ps1 | iex
For a first test, the most important command after installation is onboarding:
openclaw onboard
This guided flow helps configure the gateway, workspace, channels, and models.
I will not go too deeply into installation instructions because they may change in future versions. I recommend reading the official documentation or getting help from professionals to ensure a stable installation.
In Practice: Installing OpenClaw to Use OpenAI and Telegram for Messaging
I will demonstrate how to install OpenClaw and configure it to respond through Telegram.
For this example, I created an isolated Linux virtual machine to avoid installing it on my personal computer. I recommend using a separate computer for testing or, if you have the technical knowledge, using a VPS or creating a virtual machine as I did.
I will use Telegram as the messaging channel because it is simple to configure and offers good functionality for working with bots. Telegram is also the messaging channel I use day to day for both work and personal tasks involving agents, although I use proprietary agent technology rather than OpenClaw directly for every task.
For the AI model, I will authenticate using my personal ChatGPT account and select the gpt-5.5 model for testing.
If you want to follow this tutorial and perform your own installation, you can use the AI provider and model of your choice, as long as you have a valid subscription and / or API key.
For example, you can configure your agent to use a model from Anthropic or Google. If you are technical and have more advanced knowledge, you can also configure a free model through Ollama (a topic for another article).
Step 1: Configuring a Bot in Telegram
If you do not have Telegram installed yet, I recommend downloading the program from the official website. You will need to install the app on your phone and follow the steps to link your phone number before using it directly on your computer.
In general, the flow for configuring a new bot is:
- create a bot in Telegram using BotFather;
- copy the generated token and save it for use with OpenClaw;
- approve the first access through pairing after configuring the Gateway.
With Telegram open, use the search bar and search for BotFather. This is a bot used to configure other bots on the platform. By the way, I will use the term bot frequently in this article. Bot is short for robot. It is basically the profile we are creating for our agent.
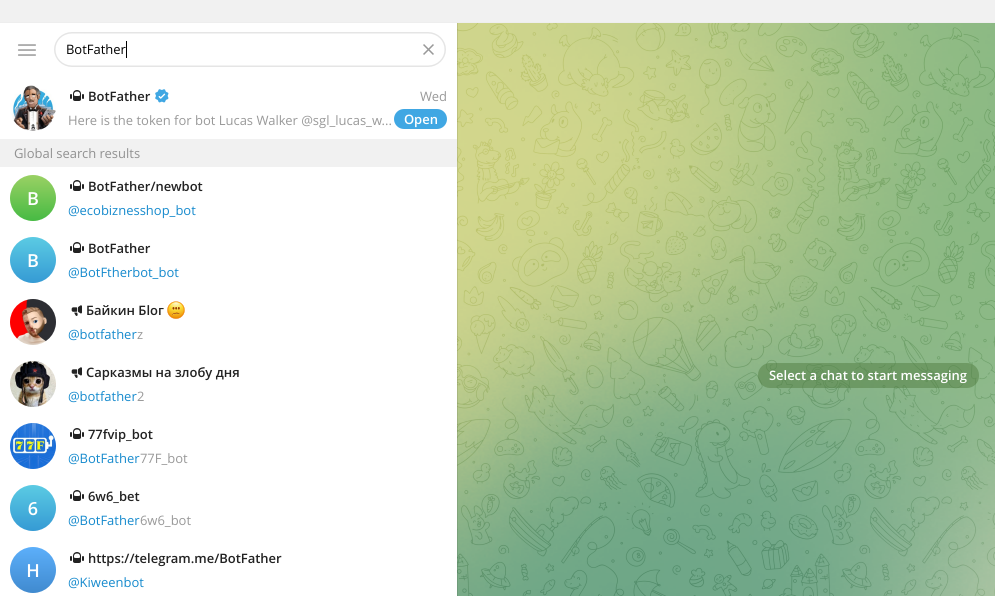
Select the bot to open the conversation and use the Start button to see the list of available commands. Then type / and select /newbot to create a new bot.
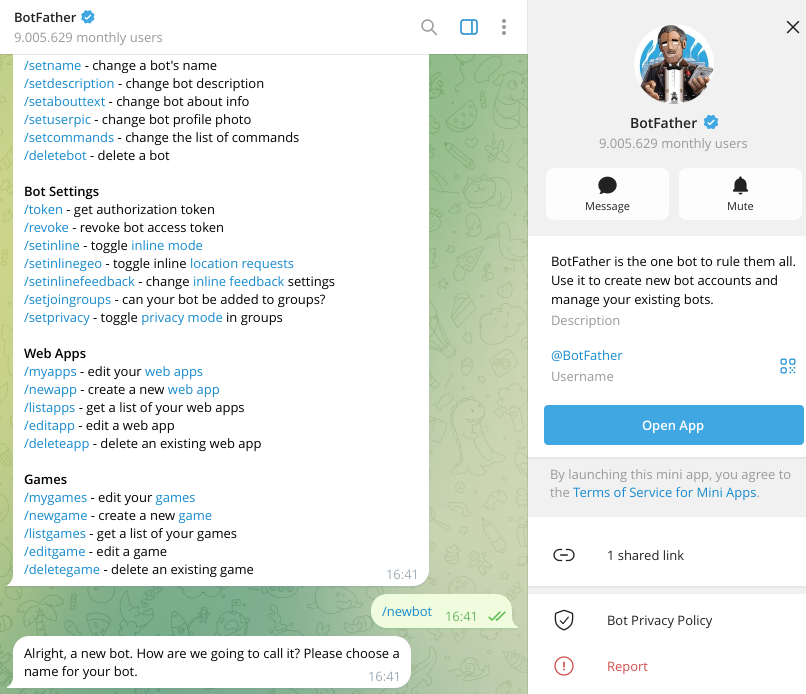
The bot will ask a few questions you need to answer.
- What do you want to call the bot?
- What username should the bot use?
The username must end with "bot". I usually use the format "agent_name_bot" for naming.
In this example, I chose the name FronteiraBot and the username fronteira_labs_test_bot.
The next message from the bot gives us a link to chat with the bot on Telegram and also a very important piece of information that we need to save: the bot access token for the Telegram API. The token looks similar to this:
0000000000:xxxxxxxxxxxxxxxxxxxxxxxxxxxxxxxxxxx
Save the token in Notepad or somewhere easy to copy and paste from.
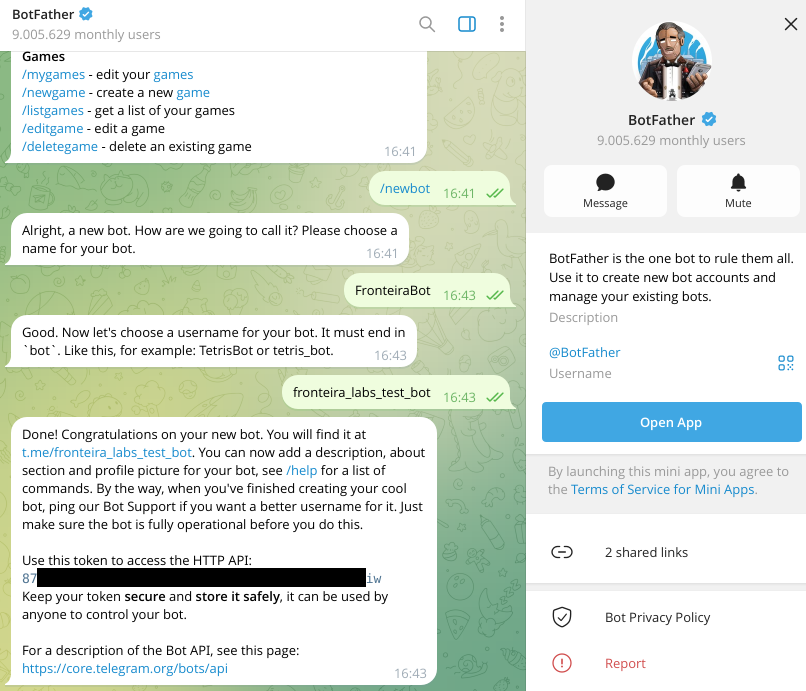
With that, the Telegram part is complete for now.
Step 2: Installing and Configuring OpenClaw
Follow the installation instructions for the operating system of the computer where you are installing OpenClaw. Once installation is complete, run the onboarding command to start the guided configuration:
openclaw onboard
The assistant will ask a series of questions to configure the gateway, AI model, and messaging channel. Let's go through each step.
Configuration type
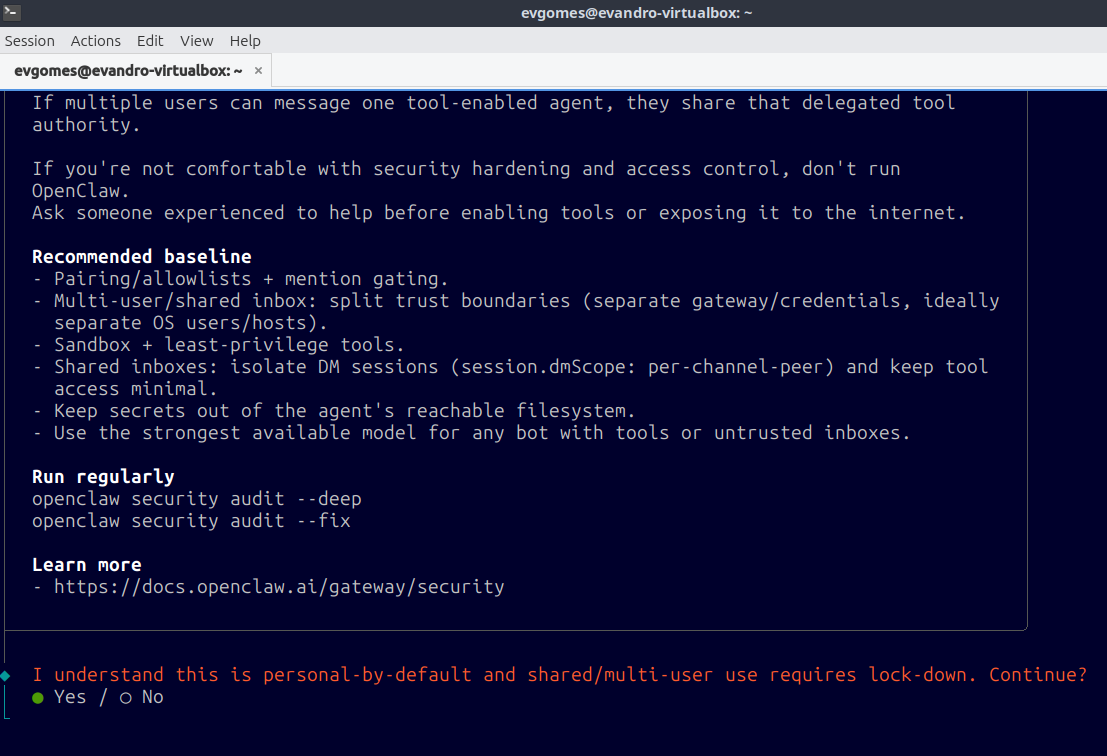
The first question on the screen asks whether you understand that the installation follows the default personal-use pattern (for a single person), and that use by multiple users requires additional steps.
Select Yes with your keyboard and continue to the next step.
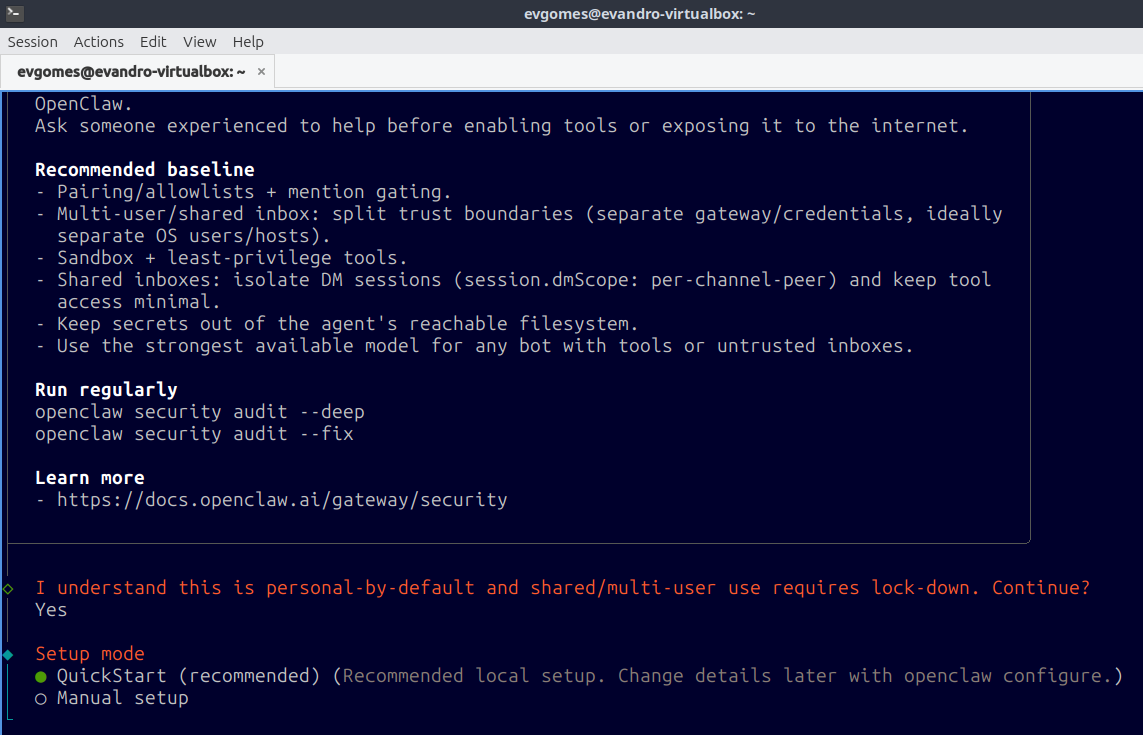
Quickstart mode
The installer offers a Quick Start mode, which automatically fills in the most common values and speeds up the initial configuration, and a Manual Setup mode, intended for more advanced users. For this tutorial, we will continue with QuickStart.
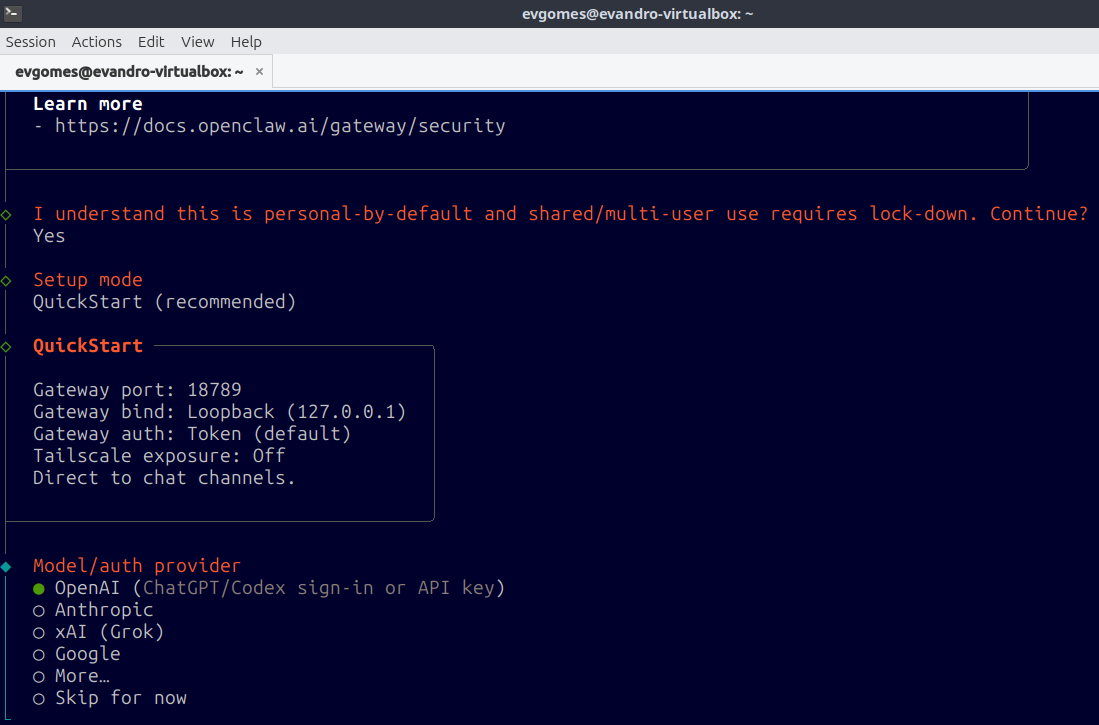
AI provider selection
On the next screen, the setup assistant presents the AI provider options. The most common providers (OpenAI, Anthropic, xAI, and Google) appear first.
You need to have a subscription to one of these providers and / or a valid API key, depending on the provider you choose.
As mentioned earlier, we will continue with OpenAI, since it allows me to authenticate with my ChatGPT account and use the gpt-5.5 model.
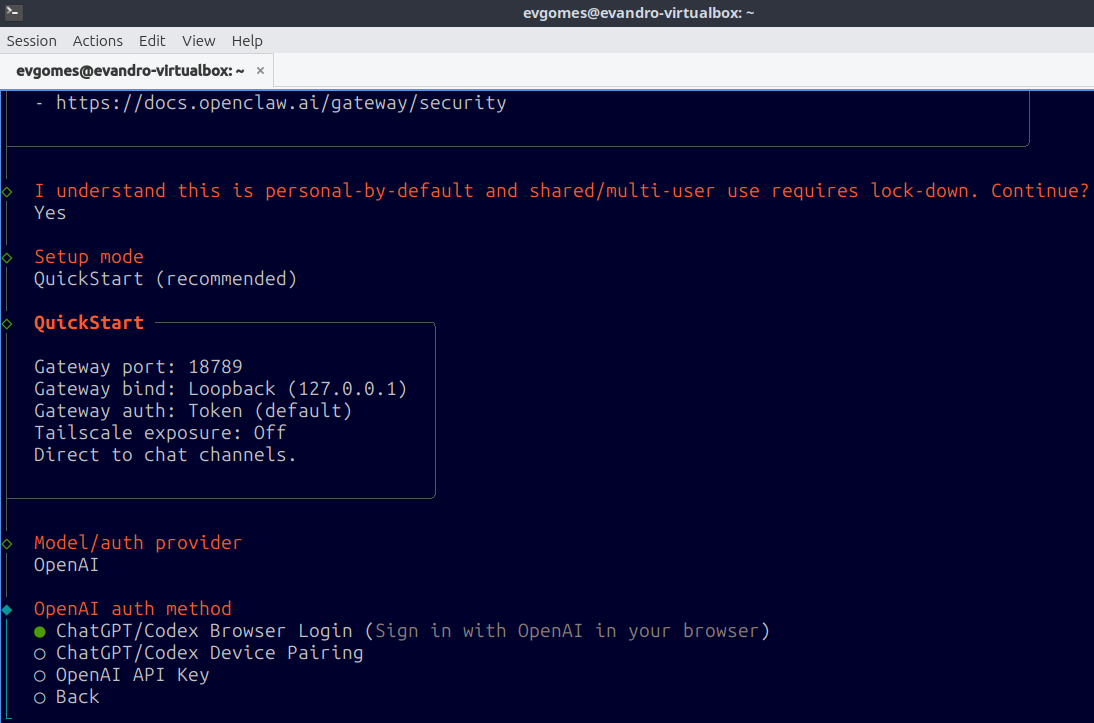
Authentication with OpenAI
To authenticate with the OpenAI provider, there are a few available options:
- Browser authentication (the first option, which I will use);
- Codex Device Pairing (for using Codex);
- OpenAI API Key (for those who want to use an OpenAI API key).
I will use the first option.
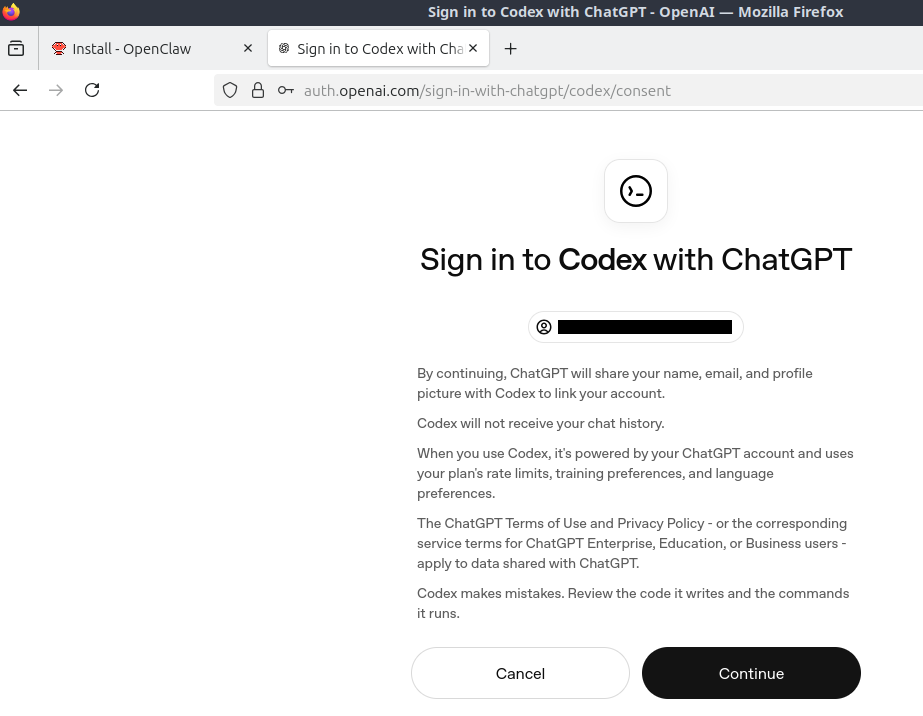
The device's default browser will automatically open the OpenAI authentication page. Log in normally with your account and, after authentication, you can close the browser tab.
Component installation
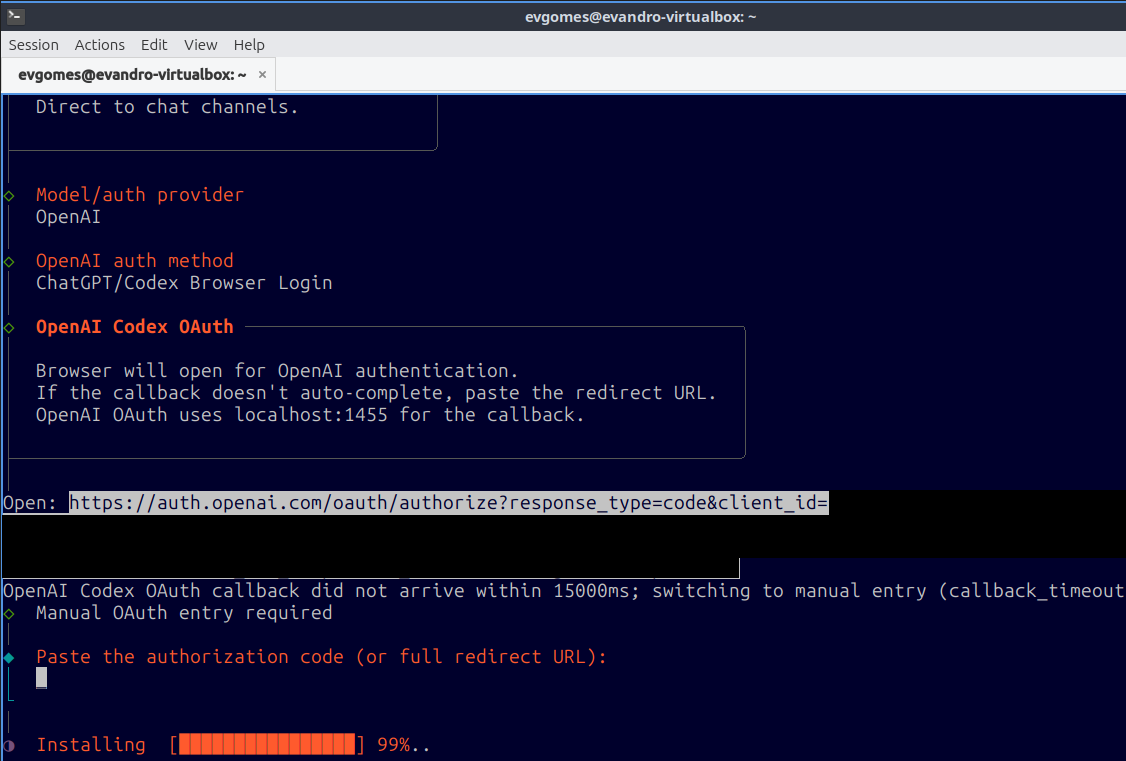
After authentication, OpenClaw will be installed and will configure the basic services, as shown in the image below. Let this step finish.
Model confirmation
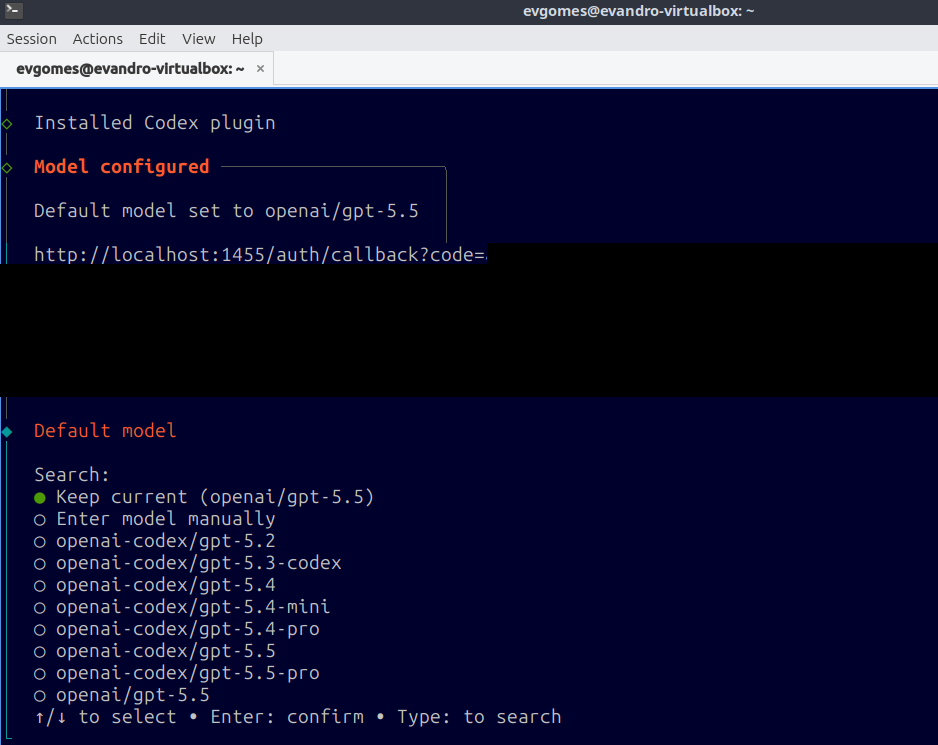
On the next screen, the AI models available for the agent are displayed.
The assistant asks whether you want to keep the suggested default model. For this example, I kept gpt-5.5, which at the time this article was written was the most current model made available by OpenAI.
Selecting the messaging channel
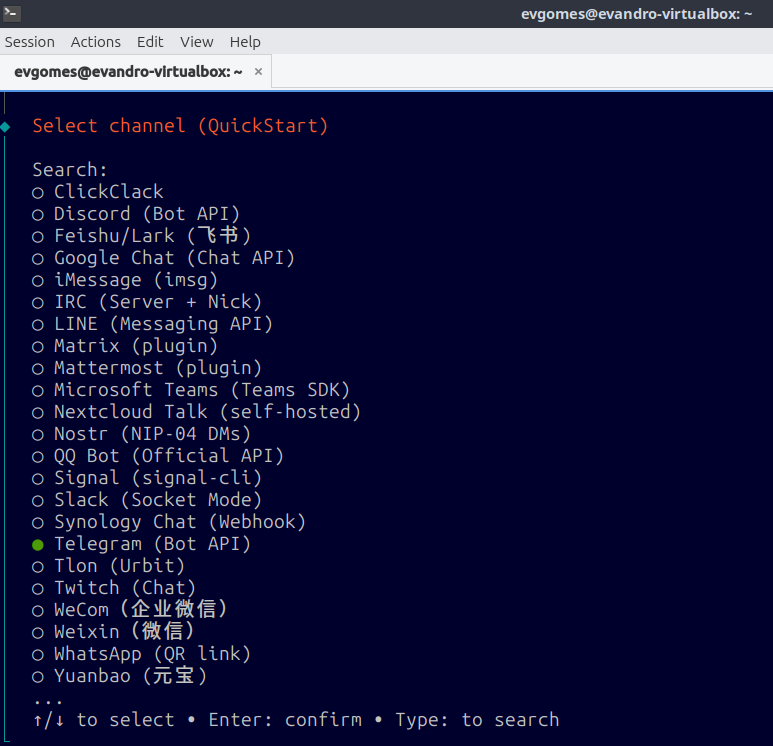
In this step, the assistant displays several messaging channel options for communicating with the agent. There is a wide range of available channels, and depending on your needs, you can choose the one you prefer.
We will continue with Telegram for this example.
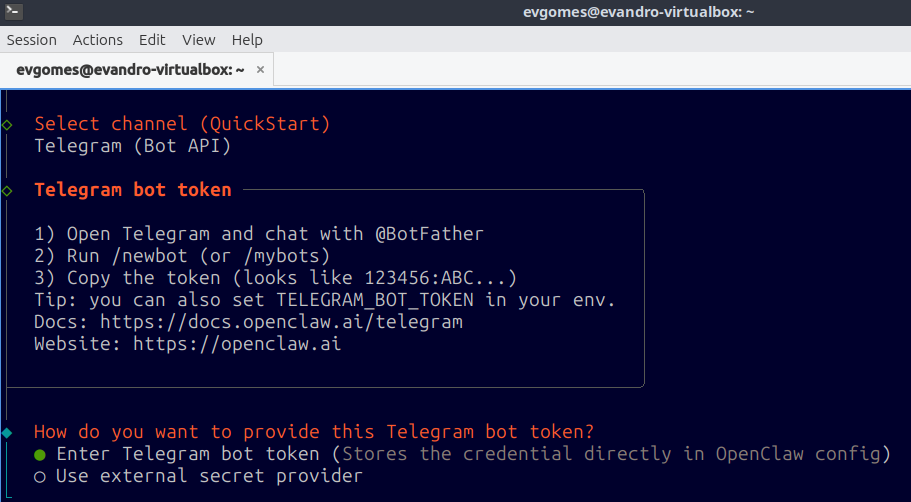
Entering the Telegram bot token
Remember the API token we received from BotFather earlier? We will need it for the configuration.
Select the first option shown on the screen (enter Telegram bot token), then paste the token obtained from BotFather.
The token is stored in OpenClaw's configuration directory.
Web search provider
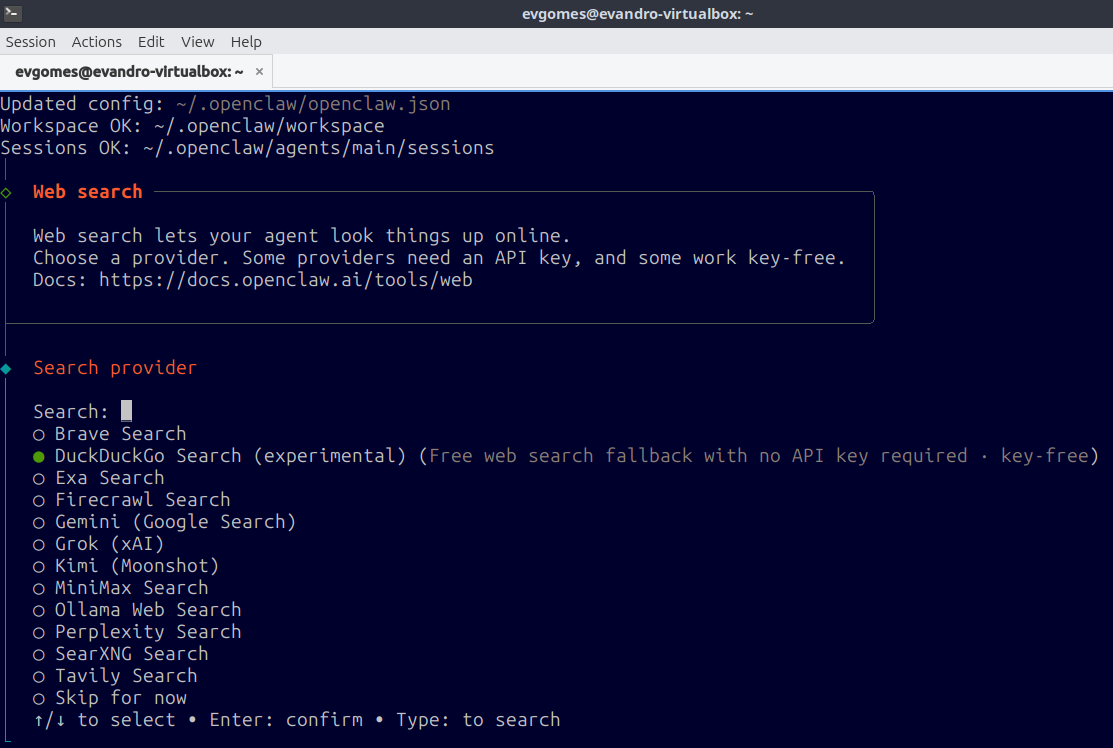
Among the most important capabilities offered by AI agents is the ability to search for content on the internet. On the next screen, the assistant presents several web search tool options that the agent can use. Some require API keys or access accounts.
For this example, we will select DuckDuckGo Search. DuckDuckGo is a search engine known for its emphasis on privacy, and the integration does not require API keys or paid accounts. For this example, it is good enough.
Note: you can later change the agent's settings related to web search engines, messaging channels, models, and other configurations through the OpenClaw configuration dashboard. This is outside the scope of this article, but I recommend reading the official documentation to understand all available options.
Configuring skills
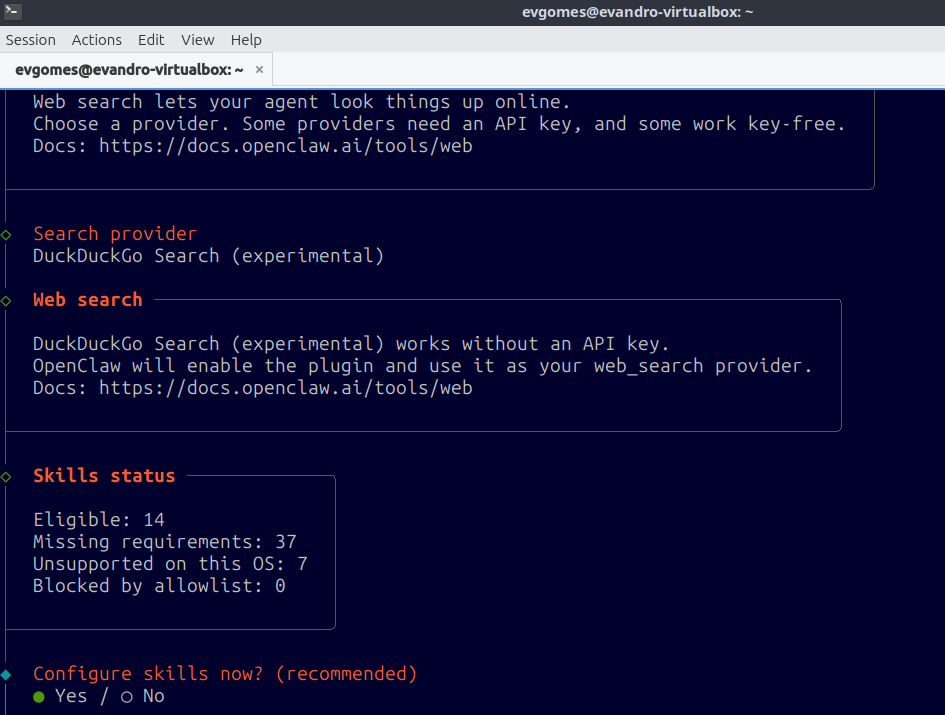
On the next screen, OpenClaw asks whether we want to configure skills as part of the initial setup.
Skills are a way to give specific abilities to your agent so it can complete a task. Examples include performing in-depth research on a topic and generating a report, accessing an external service, interacting with office tools and email, and others.
There are websites dedicated to sharing useful skills for AI agents. For this example, we will not go deeper into any preconfigured skill, but the topic is worth studying if you want to understand how to give agents useful abilities for completing tasks.
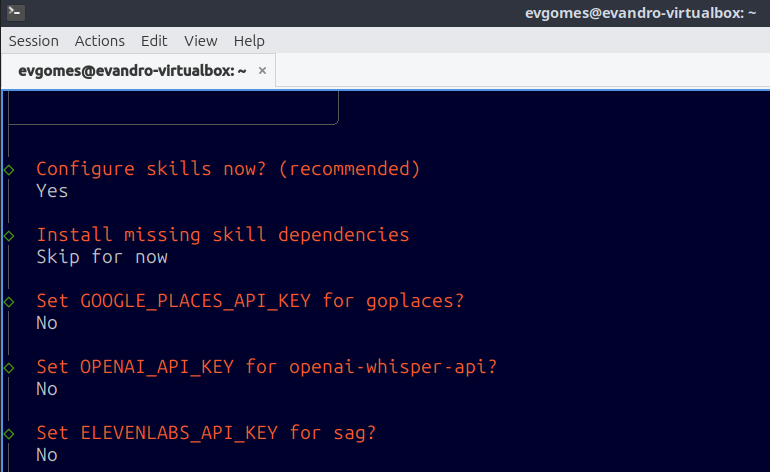
Continuing the setup, I selected Yes only to show the skills available by default, then selected the first option to skip this step for now. You can see some interesting skills in the list.
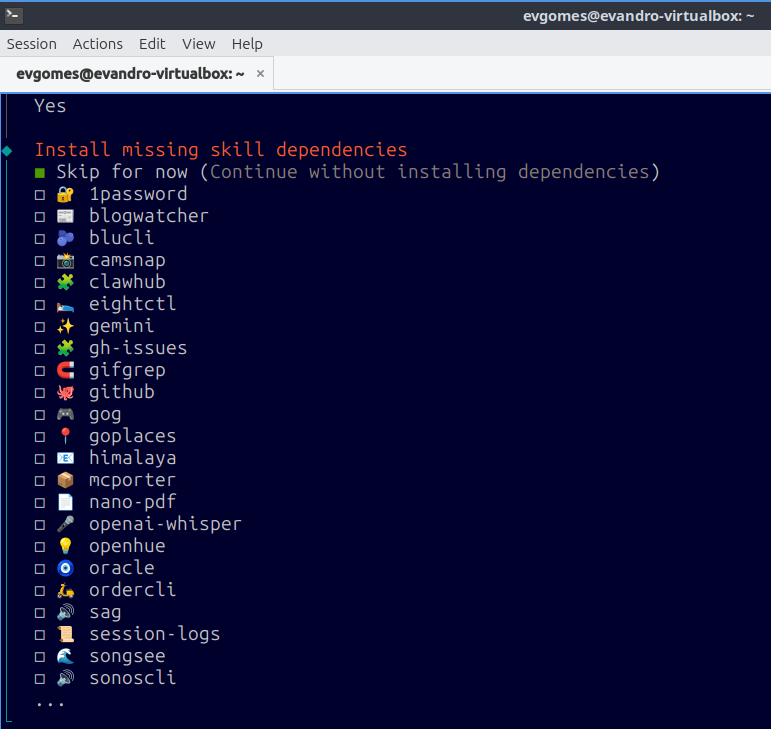
Still as part of this step, the agent asks whether you want to provide API keys so selected skills can work. For example, this step includes requests for Google Places, OpenAI, and ElevenLabs API keys.
To continue, I simply skipped those configurations because they are not needed for now.
Hooks
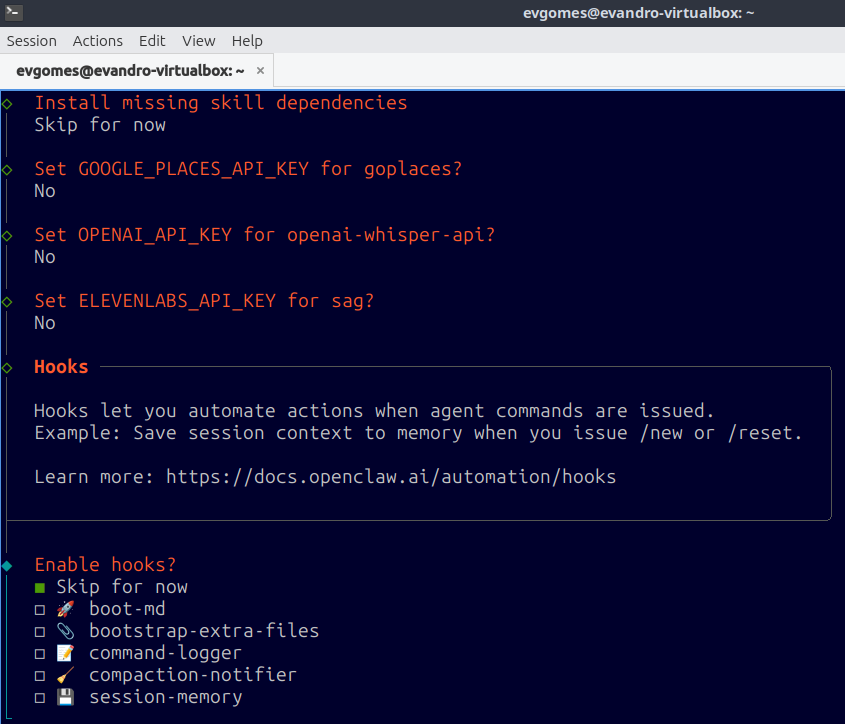
Hooks are automatic actions triggered by specific agent commands, such as /new or /reset. They are useful for configuring a specific behavior or action that you want to run when certain commands or events are triggered by the agent or by the user interacting with it.
In general, this option is more useful for people with a technical background who need to build automations.
For this tutorial, I selected Skip for now.
Starting the agent
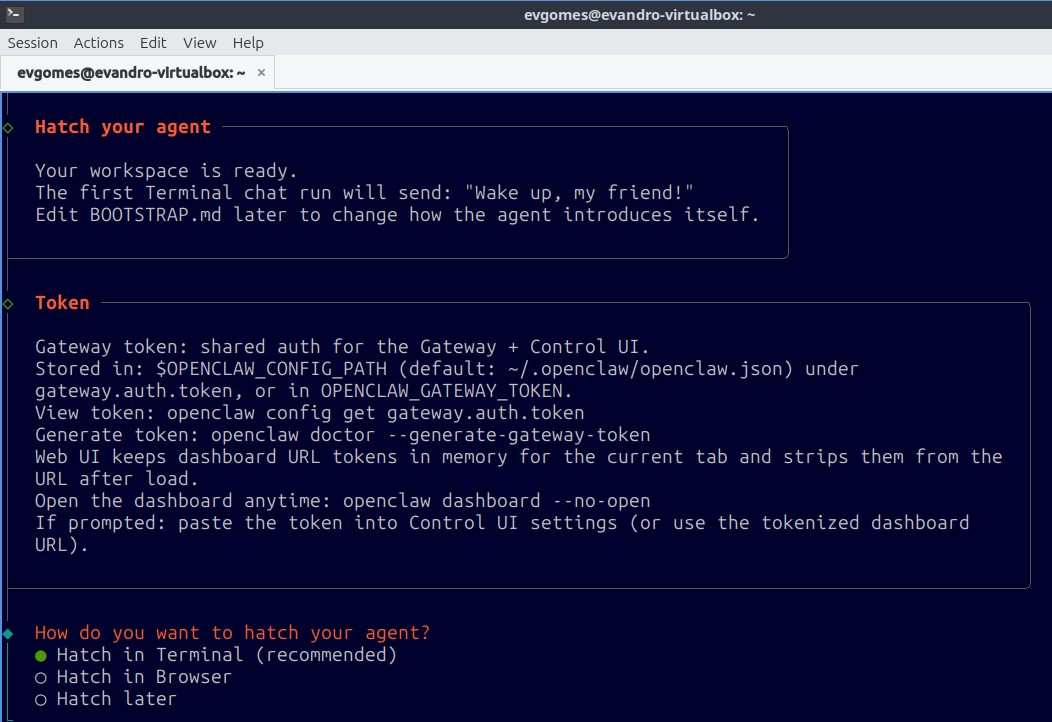
At the end of the configuration, the assistant informs you that the workspace is ready and asks how you want to start the agent for the first interaction.
Select Hatch in Terminal. In this context, it means starting the first interaction directly through the terminal used for configuration, without needing to use Telegram yet.
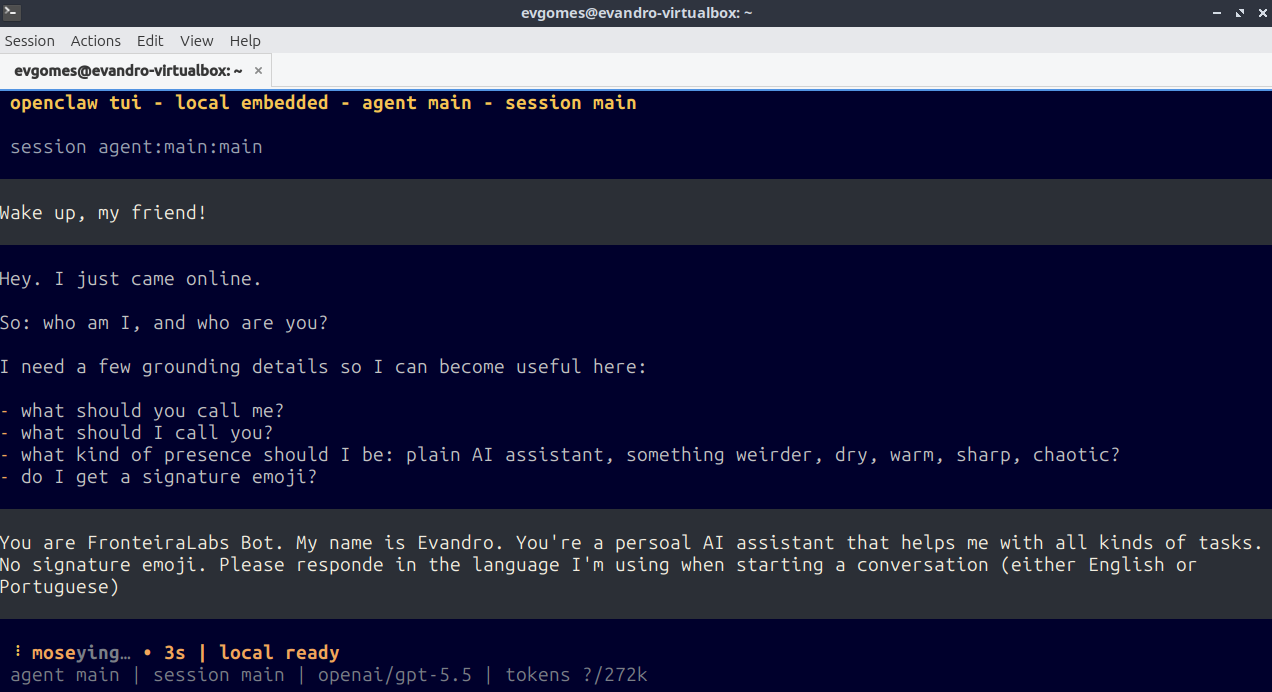
When it starts, the agent sends a welcome message and asks a few initial questions to establish its identity:
- The agent's name;
- The name of the person the agent is talking to;
- The agent's role (what it does and what its responsibilities are);
- The personality and tone of voice the agent should adopt (friendly, objective, shy, and so on);
- Which emoji should be used as the agent's "personal signature", or whether you do not want a signature emoji.
These answers are saved in the BOOTSTRAP.md file (part of the agent's identity) and serve as the base instruction for the agent every time it is restarted.
In my case, I defined the name FronteiraLabs Bot, provided my name, asked it to respond in the language I am using (Portuguese or English), and opted out of the signature emoji.
Here is the instruction I used:
You are FronteiraLabs Bot. My name is Evandro. You are a personal AI assistant that helps me with all kinds of tasks. Do not use a signature emoji. Please reply in the language I use when starting a conversation (English or Portuguese).
Step 3: Linking Telegram to the agent
At this point, the agent is already running, but one final adjustment is needed so it can respond through Telegram. For security reasons, you need to pair and authorize your own Telegram user to talk to the agent through the platform.
Open Telegram again and start a conversation with the bot you created in Step 1. You can do this through the link available in the BotFather message. Use the Start button to begin a new conversation. This button sends the /start command to the agent, which ensures the beginning of a new session.
The bot will respond by saying that access is not configured yet and will display a pairing code. Copy the command shown in the bot's message, which has the following format:
openclaw pairing approve telegram YOUR_CODE
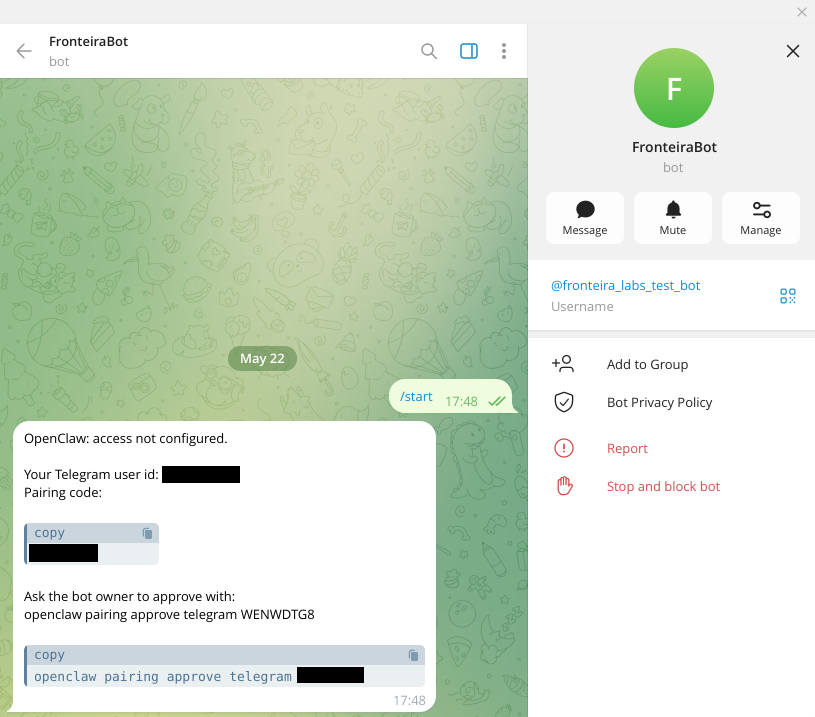
Open a new terminal / PowerShell window (or whatever you are using to configure the agent) and paste the pairing command:
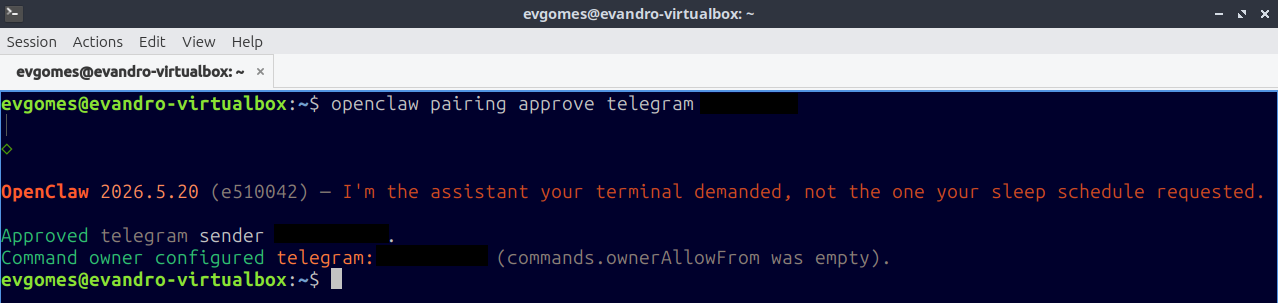
Once this step is complete, you should be able to talk to the agent normally.
Step 4: First conversation
With pairing complete, the agent is ready to receive messages. Send /new to start a new session and begin talking normally. If the configuration was completed correctly, you should receive a response after sending your message.
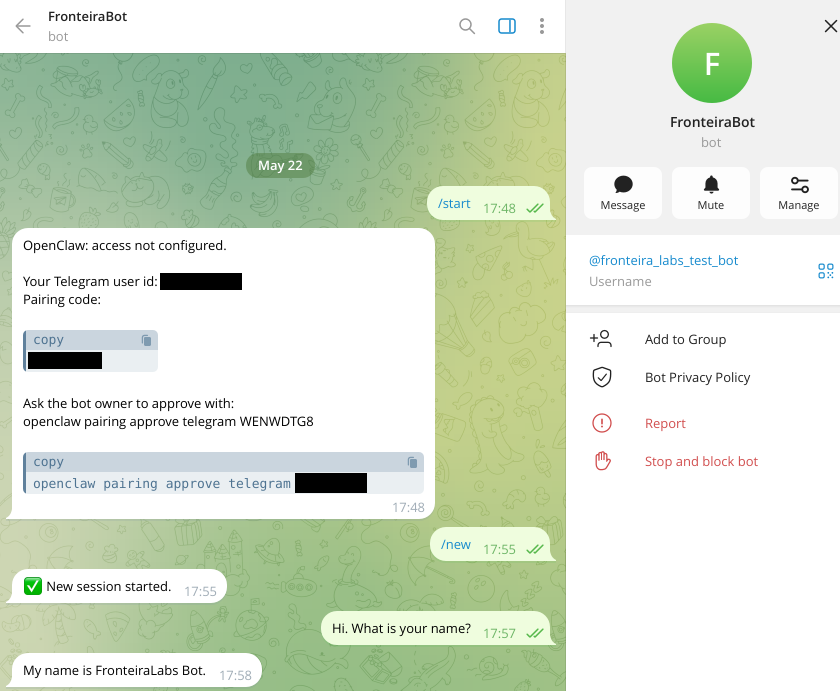
That's it! Your agent is ready to use, and you can start talking to it to get help with whatever tasks you need.
Practical Example: Bill Payment Reminders
With the agent running, it is time to see OpenClaw in action with a real task. We will create a spreadsheet with bills to pay during the month and then configure a scheduled task to notify us on Telegram about bills due in the next three days.
The advantage of having an agent configured like this is that we do not necessarily need programming knowledge. We can use natural language, which is basically how we normally talk to other people, and ask the agent to generate the spreadsheet and configure the notifications.
Important: in some cases, the agent may generate code scripts to complete tasks, so it is useful to have some understanding of what they do to avoid running harmful commands on the computer. If you do not know programming, always ask the agent what the script does, and confirm with other AI models or people in the field whether the explanation is correct. Security is never too much.
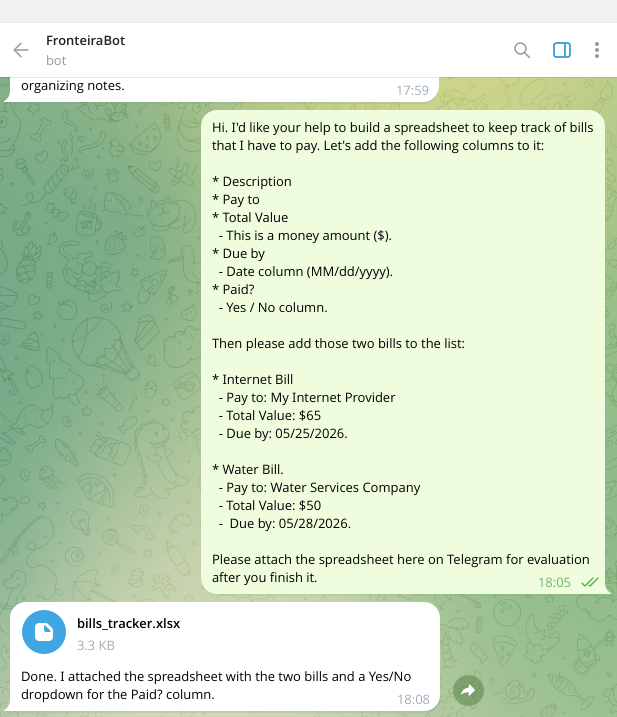
Returning to the conversation with the agent, this was the instruction (or prompt) I sent:
Hi. I'd like your help to build a spreadsheet to keep track of bills that I have to pay. Let's add the following columns to it:
- Description
- Pay to
- Total Value, money amount ($)
- Due by, date column (MM/dd/yyyy)
- Paid?, Yes / No column
Then please add those two bills to the list:
- Internet Bill, Pay to: My Internet Provider, Total Value: $65, Due by: 05/25/2026
- Water Bill, Pay to: Water Services Company, Total Value: $50, Due by: 05/28/2026
Please attach the spreadsheet here on Telegram for evaluation after you finish it.
The agent responded in a few minutes, sending the bills_tracker.xlsx file directly in the Telegram chat, with all requested columns and a Yes / No dropdown in the Paid? column.
Note: results may vary depending on the model used and how the request is written. Remember that AI models do not return deterministic results. If you send the same prompt more than once, you may notice differences in the output, so your experience can vary a little.
When I opened the file, the spreadsheet was exactly as requested: structured columns, formatted values, and the two bills already filled in.

With the spreadsheet created, the next step was to configure an automatic daily notification to warn about bills due soon. I sent the following prompt:
I'd like to receive notifications every day at 9am ET notifying me of bills I'll have to pay in the next 3 days.
The message can be sent here on this same chat.
Please configure a scheduled job to run it, then run it once manually to make sure it is configured correctly.
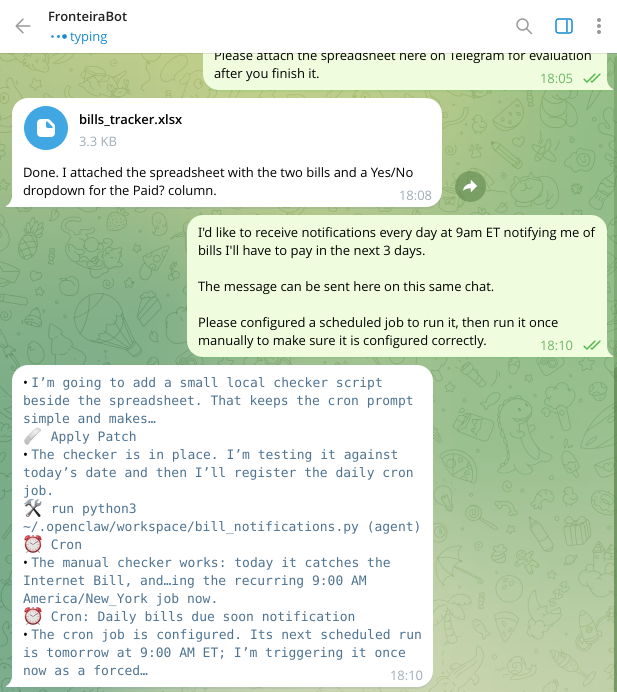
The agent not only created the routine, but also made an interesting architectural decision on its own: instead of putting all the logic directly inside cron, which is the system used for scheduled tasks, it created a separate Python script (bill_notifications.py) in the workspace, keeping the cron prompt simple and the code reusable (this connects to the earlier point about the agent making decisions to write source code and the importance of reviewing scripts).
Another interesting point: during the generation process, it is possible to see what the agent is "thinking" and understand the flow it decided to follow to generate the scheduled routine.
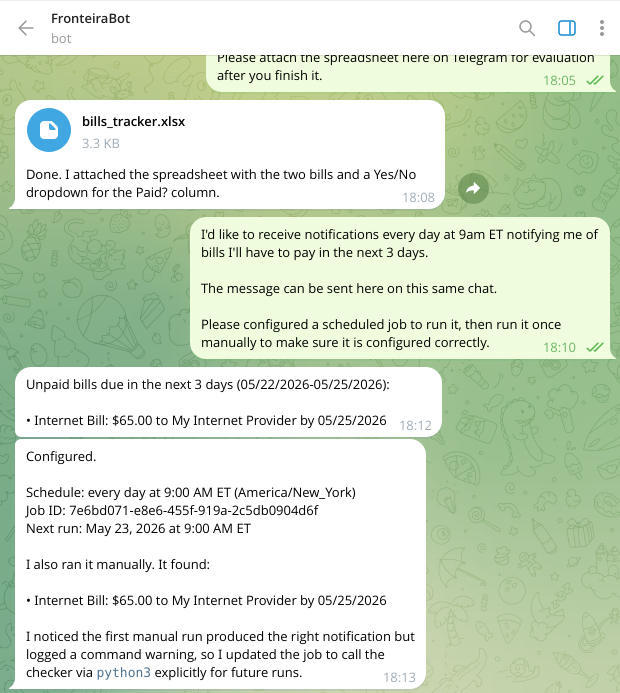
The result arrived in two separate moments. First, the agent sent the notification generated by the manual execution, confirming that the internet bill was correctly included in the alert, considering the date when the tests were executed (05/22/2026).
Then it sent a complete summary of the scheduled task configuration, including the ID (routine code), the schedule, and a note about an adjustment it made to ensure that the script execution command would be called explicitly in future runs.
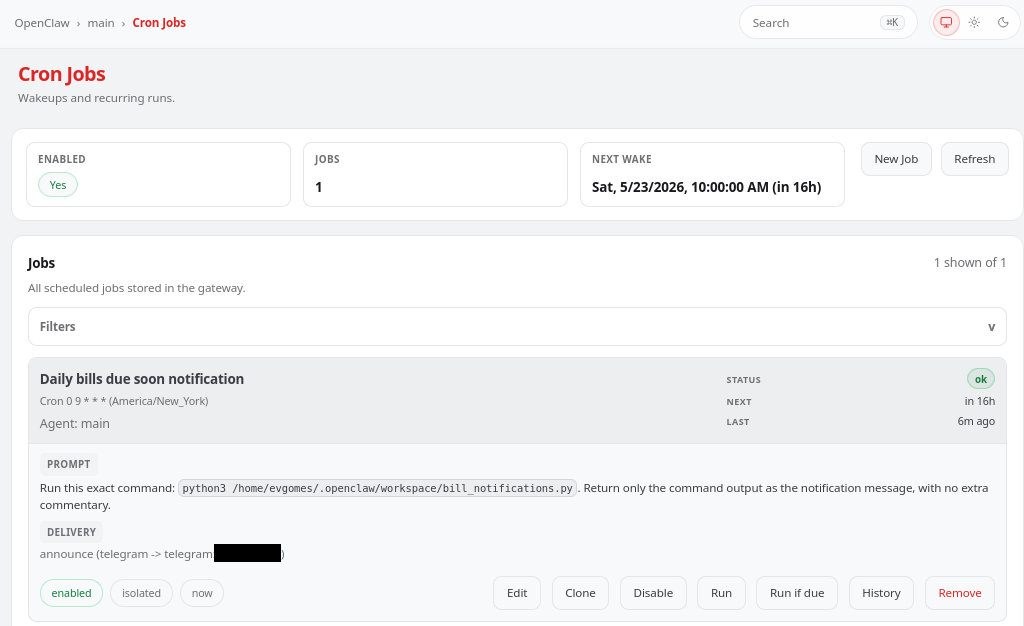
It is not the purpose of this article to cover every OpenClaw feature in depth, but the platform does offer a dashboard where you can check and modify all agent settings.
In one of the dashboard screens, it is possible to view the scheduled task registered by the agent.
I recommend reading the OpenClaw documentation to understand all features available in the platform.
This example clearly illustrates what separates OpenClaw from a regular chatbot. You can talk to the agent to generate documents and configure useful procedures for everyday life or work. If you are a programmer, you can also use the agent to write code or execute tasks autonomously.
How does OpenClaw compare to Copilot, Claude Code, and Codex?
The most useful comparison is not to ask which tool is "better" in absolute terms. The better question is: what kind of work was each tool designed for?
OpenClaw
OpenClaw stands out as a self-hosted, multichannel personal agent platform. Its focus is to combine model, persistent gateway, workspace, messaging channels, scheduled tasks, and tools in an environment controlled by the user.
It makes more sense when the goal is to create an assistant that lives outside the code editor, communicates through messages, works with files, and participates in personal or operational routines.
GitHub Copilot, Claude Code, and Codex
These agents are very strong in the software development workflow. They integrate with tools such as GitHub, code editors, the terminal, and implementation workflows. For programmers and technology professionals, they are very useful tools.
If the goal is to have a personal assistant accessible through another messaging channel such as Telegram, or even to use an agent to write code without needing to keep the code editor open or stay connected to a terminal or third-party platform, then OpenClaw makes more sense than those tools.
Conclusion
OpenClaw is worth considering for those who want to experiment with AI agents beyond the traditional chat interface and are willing to deal with configuration, permissions, and security.
It is especially interesting for people who want to test a more operational personal assistant, run scheduled routines, and use AI models from different providers.
At the same time, it is not a tool that should be configured carelessly. The ability to act on the environment is exactly what makes the project useful, and also what creates risk.
For most users, the best path is to start small:
- run it in an isolated environment;
- use a test workspace;
- connect only one channel;
- enable only a few tools;
- review commands and permissions;
- avoid sensitive data at first.
With this approach, OpenClaw can be a good way to understand in practice where AI agents are heading.
The main shift is from systems that only chat to systems that can participate in real workflows, with files, tools, channels, and routines. This transition is one of the most relevant parts of AI applied to business and everyday work.
When automation, context, and control move together, AI agents stop being a technical curiosity or isolated chat experience and start becoming part of the productivity infrastructure.
Sources
- OpenClaw GitHub: https://github.com/openclaw/openclaw
Accessed on May 22, 2026. - OpenClaw Docs, Gateway architecture: https://docs.openclaw.ai/concepts/architecture
Accessed on May 22, 2026. - OpenClaw Docs, installation: https://docs.openclaw.ai/install
Accessed on May 22, 2026. - OpenClaw Docs, configuration: https://docs.openclaw.ai/gateway/configuration
Accessed on May 22, 2026. - OpenClaw Docs, Telegram: https://docs.openclaw.ai/channels/telegram
Accessed on May 22, 2026. - OpenClaw Docs, OpenAI provider: https://docs.openclaw.ai/providers/openai
Accessed on May 22, 2026. - OpenClaw Docs, security: https://docs.openclaw.ai/gateway/security
Accessed on May 22, 2026. - OpenClaw Docs, exec tool: https://docs.openclaw.ai/tools/exec
Accessed on May 22, 2026. - OpenClaw Docs, cron jobs: https://docs.openclaw.ai/automation/cron-jobs
Accessed on May 22, 2026. - OpenClaw Docs, Windows: https://docs.openclaw.ai/platforms/windows
Accessed on May 22, 2026. - OpenClaw Docs, macOS: https://docs.openclaw.ai/platforms/macos
Accessed on May 22, 2026. - GitHub Docs, Copilot cloud agent: https://docs.github.com/en/copilot/concepts/agents/cloud-agent/about-cloud-agent
Accessed on May 22, 2026. - GitHub Docs, Copilot CLI: https://docs.github.com/en/copilot/concepts/agents/copilot-cli/about-copilot-cli
Accessed on May 22, 2026. - Claude Code Docs, overview: https://code.claude.com/docs/en/overview
Accessed on May 22, 2026. - Claude Code Docs, routines: https://code.claude.com/docs/en/routines
Accessed on May 22, 2026. - OpenAI Developers, Codex quickstart: https://developers.openai.com/codex/quickstart
Accessed on May 22, 2026. - OpenAI Developers, Codex CLI features: https://developers.openai.com/codex/cli/features
Accessed on May 22, 2026. - OpenAI Developers, Codex security: https://developers.openai.com/codex/agent-approvals-security
Accessed on May 22, 2026.